Timeline

Viewing your project on a timeline

You can view any project that you have in Asana in timeline view.

To access your project’s timeline, click the Timeline tab in your project.

Subtasks do not automatically inherit the project or assignee from their parent tasks. You need to manually add a subtask to a project and add a due date/date range for it to appear in the project’s timeline.
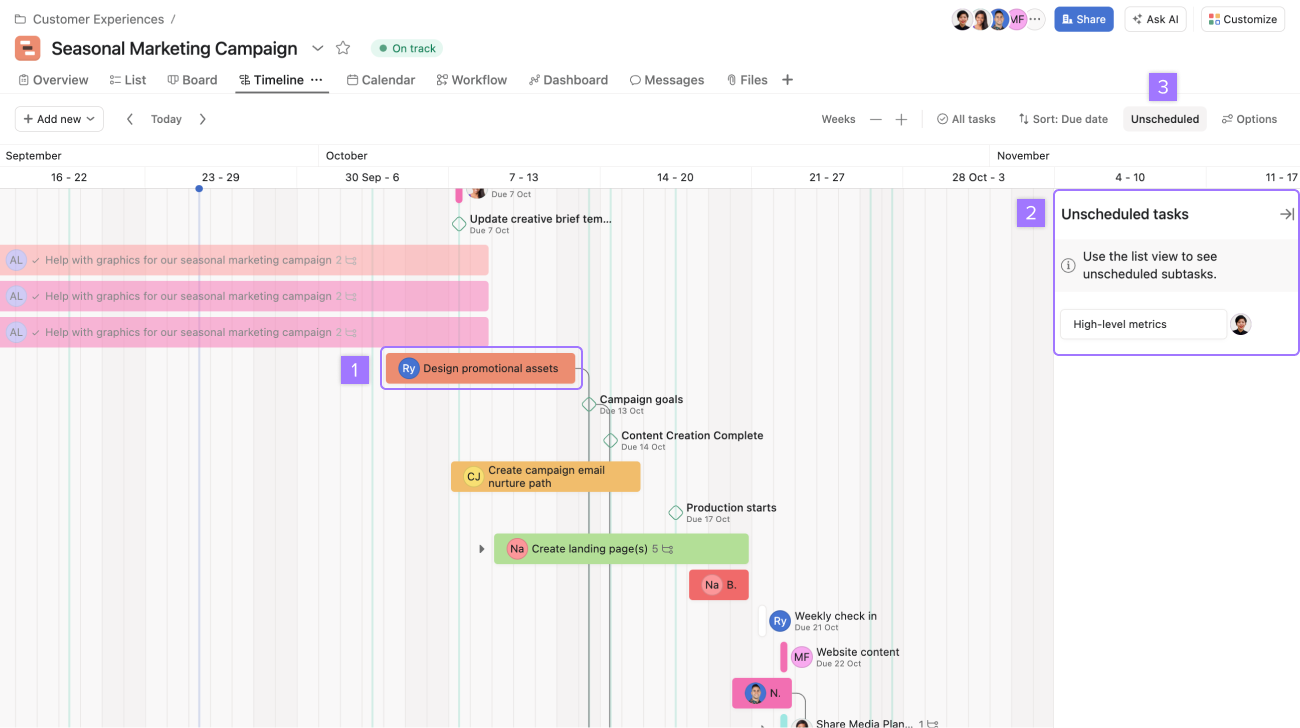
  • Any task in your project with a due date or date range will automatically show up on your timeline.
  • Unscheduled tasks in your project that don’t have due dates will appear to the right of your timeline in the Unscheduled Tasks section.
  • Hide Unscheduled Tasks by clicking the arrow icon to the right, or by clicking the Unscheduled toggle icon on your project toolbar.


Scheduling tasks on your timeline

To move tasks from Unscheduled Tasks onto your timeline, you can drag the task from the unscheduled bucket onto the correct dates on your timeline or click back into your list or board view and add a due date or date range to that task. Once the task has a due date, it will appear on your timeline.

Rescheduling tasks in bulk

You may need to reschedule planned tasks in bulk to align with the parent task dates or bumps in the project.


How to push out mass dates:

You can multi-select tasks, then drag them across to where you see a more realistic date on your timeline.

From your timeline view:

  1. Click the first task in your selection
  2. Hold the command key on your keyboard (Ctrl on a PC)
  3. Multi-select other tasks and move when the rectangle is blue
  4. Drag to the new time frame
  5. All the other tasks should appear with dates adjusted accordingly

You can shift multiple due dates in a list by changing the view to Sort by Due Date, multi-selecting the tasks you want to change, or press and hold command (Ctrl on a PC) then use the up and down arrows to adjust all the due dates one day at a time.


Create a new task on your timeline

To create a new task from your timeline, you can click directly on your timeline on the date you’d like to schedule the task and type in the name of your task. You can then click on the task's details to add additional information and assign it. The task will appear directly on your timeline and in your list and board view.

Setting colors on your timeline

The best way to set colors on your timeline is to create custom fields and set colors for each field. Then, when you set a custom field value on tasks, that color can be viewed on your timeline.

To set colors on your timeline, click the Color drop-down to choose your color preferences.

You can choose Asana Default, which pulls from other colors you have set in Asana, or you can set your color logic based on custom fields. Once you’ve chosen which custom field you'd like to use, you can save that view for everyone, so your entire team will see the same color logic when they view the project in timeline.

Dependencies on your timeline

You can set dependencies directly on your timeline by clicking the connector icon that appears when hovering over a task and then dragging it to another task.

To draw dependencies on your timeline:

  1. Click on the connector icon when hovering over a task
  2. Drag the connector over to the task you wish to mark as Dependent On.


If the tasks in your project are dependent on others, they will show as connected on your timeline.

If there are no date conflicts, a task will be connected to the task it’s dependent on via a grey line on your timeline.

If dependent tasks overlap on your timeline, for example, if one task has a start date that starts before a task it is dependent on is completed, a red dependency line will show up on your timeline to indicate a potential conflict.


Zooming on your timeline

You can zoom on your timeline and view it by Hours, Days, Weeks, Months, Quarters, Half-year, or Years.


Sharing your timeline

Anyone with access to your project will have access to the project’s timeline. If you’d like to share a timeline with someone in your company, you can send them the link to your project’s timeline if the project is public by copying the URL. Alternatively, add them as a collaborator to tasks in your project if the project is private.

Dependency date shifting

Dependency management options

There are three different dependency date shifting options to choose from.

screenshot_title

To access the different date shifting options, click the 3-dot icon in the top right corner of your project’s timeline view, then select Timeline options. The options are explained further below.

Note the requirements for auto-shifting due dates to work properly are as follows:

  • A task has been marked as dependent on another, either blocking or blocked by another task.
  • The blocking and blocked tasks both have due dates set. Start dates do not interfere with this process.
  • Tasks are not marked as complete. Changes in dates will not have an impact on completed tasks

Maintain due date buffer with lag shifting

Select Maintain buffer to maintain the amount of time between dependent tasks. This process is known as lag shifting.

Maintain buffer

In maintaining the buffer between dependent tasks, the due date of each task will move relative to the shifted task's due date while preserving the amount of time between them.

Consider the 3 tasks in the screenshot example provided.

  1. Choose party venue, due on June 1.
  2. Organize catering, due on June 3.
  3. Send out invites, due on June 10.

Choose party venue is blocking Organize catering, which itself is blocking Send out invites.

screenshot_title

With lag shifting, moving the due date of Organize catering back by one week to June 8 means that the due dates of both Choose party venue and Send out invites also shift by one week to preserve the gap. The 2-day gap between Choose party venue and Organize catering remains, though the due dates have changed. The 7-day gap is also maintained between Organize catering and Send out invites.

In the second phase of the example, moving Organize catering's due date forward in time from June 10 to June 9 has the same effect - the due dates of both Choose party venue and Send out invites move by 1 day to maintain their respective gaps.

Consume due date buffer with slack shifting

Select Consume buffer to consume the amount of time between dependent tasks unless there's a conflict. This is also known as slack shifting.

Consume buffer

In consuming the buffer between two dependent tasks, the due date of one task will not move relative to the shifted task’s due date.

Consider the 3 tasks in the screenshot example provided.

  1. Choose party venue, due on June 1.
  2. Organize catering, due on June 3.
  3. Send out invites, due on June 10.

Choose party venue is blocking Organize catering, which itself is blocking Send out invites.

screenshot_title

With slack shifting, moving the due date of Organize catering to June 7 will have no impact on either of the other tasks, since it does not cause a due date conflict. Similarly, the buffer between Organize catering and Send out invites is not maintained - the 7-day gap becomes a 3-day gap.

In the second phase of the example, Organize catering is still blocked by Choose party venue. Moving the due date of Organize catering forward in time to May 31 will result in a dependency due date conflict. Therefore, the due date of Choose party venue must move forward in time to accommodate this. The due date of Choose party venue moves forward one day in order to respect the dependency, and receives a new due date of May 30.

Ignore due date buffer

Select None to ignore the amount of time between dependent tasks, even if there's a conflict. With this option, the buffer will neither be maintained or consumed. Conflicts between due dates of dependents tasks will also not be considered.

None

Consider the 3 tasks in the screenshot example provided.

  1. Choose party venue, due on June 1.
  2. Organize catering, due on June 3.
  3. Send out invites, due on June 10.

Choose party venue is blocking Organize catering, which itself is blocking Send out invites.

screenshot_title

With None selected, the amount of time between due dates is ignored entirely. In the example, the due dates change and do not respect the dependencies between the tasks. Blocked tasks can still be slated to be completed before tasks that they are dependent on.

Weekend awareness

weekend-awareness

Use weekend awareness to automatically avoid scheduling tasks on weekends when shifting due dates of dependent tasks.


Critical path on timeline

Available on Asana AdvancedEnterprise, and Enterprise+ tiers, as well as legacy tiers Business and Legacy Enterprise. Visit our pricing page for more information.

With critical path, you can quickly identify which tasks are crucial for the completion of your project and visualize them on your timeline view. Critical path will allow you to take note of roadblocks and manage your project’s timeline while providing you with a complete view of your project.

Calculating your project’s critical path

Your project’s critical path is the longest chain of dependent tasks that need to be completed for your project to be finished. However, subtasks are not included when calculating your critical path.

Calculating how long it will take you to complete your project is done through task duration and dependencies between these tasks, including any time gaps.

For example:

  • Task B is dependent on Task A
  • Task A’s date range is December 1 to December 5
  • Task B’s date range is December 10 to December 20

The total time for this path would be 20 days.

To determine your project’s critical path, your project needs:

  • Tasks with a due date to detect task duration
  • Task dependencies
  • The last due task in your project must be dependent on other tasks

Your critical path will vary depending on changes in dependencies and due dates.

Note: Critical path is available to projects with a maximum of 2000 tasks with due dates.


Highlighting your critical path

To visualize your project’s critical path on your timeline view, click on the Timeline tab.

highlight critical path

From here, you can:

  1. Click on the three dot icon
  2. Enable Highlight critical path

Your project’s critical path will be highlighted in yellow.

If you cannot see your critical path right away in your timeline view, scroll to your last due task. If this task has no dependencies, you will only see this task highlighted.

Note: Your critical path won’t be highlighted if the task presents circular dependencies. For example, A is blocking B is blocking C is blocking A.

Like what you see? Get started with a free 30 day Asana trial today. Try for free

Sections on your timeline

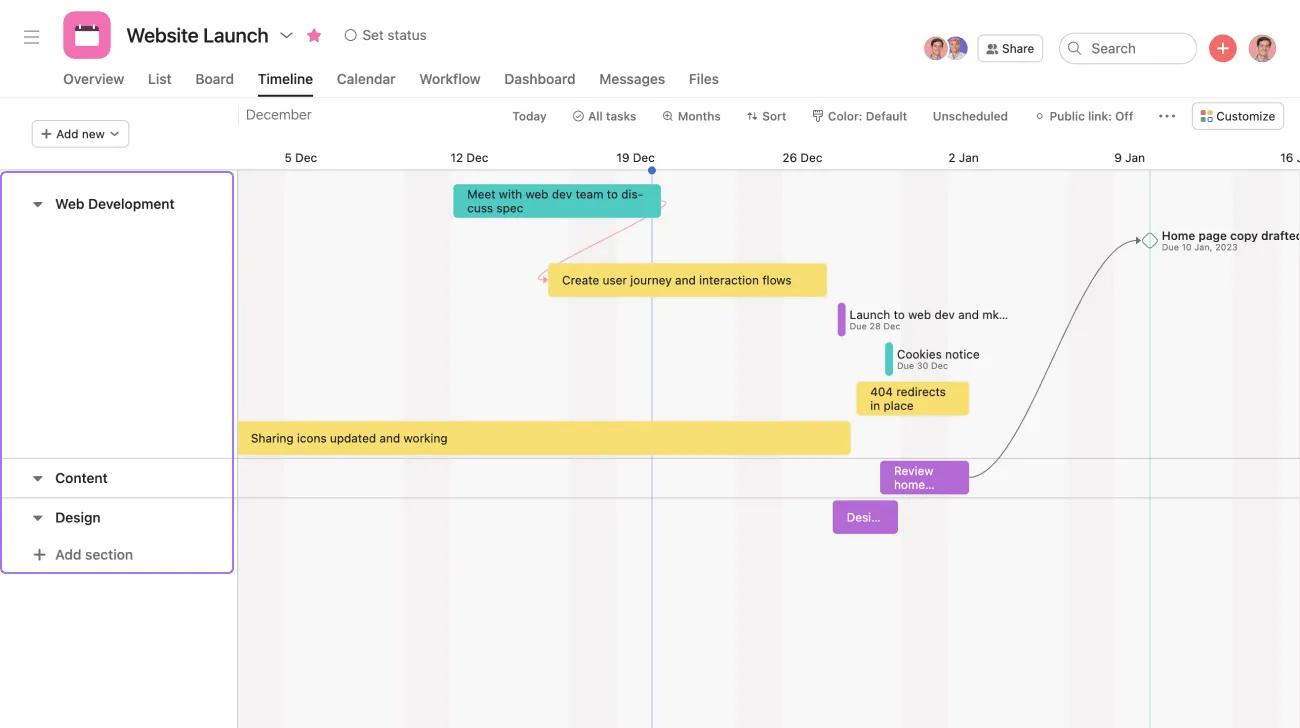
Sections add a new level of categorization to your project plan. You can view your work your way, share a plan with more visual indicators of task types, and adapt your plan while knowing how tasks are grouped.

Sections

Sorting on your timeline

You can also sort your tasks on your timeline by either start date or due date or assignee and then save that as your default view.
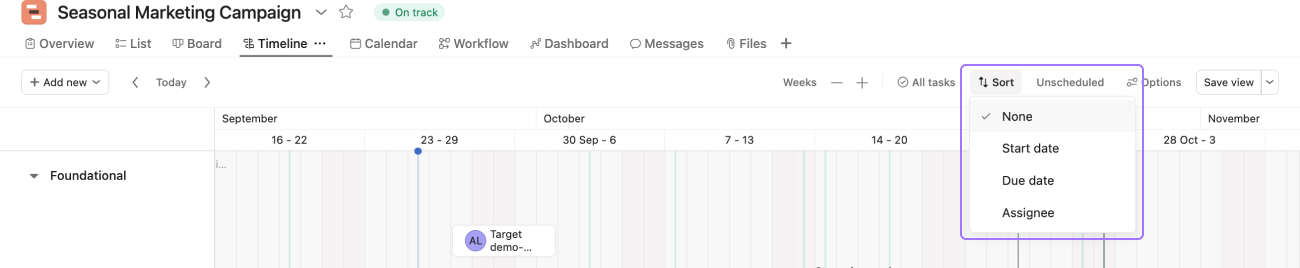
Sort by

To sort your tasks on your timeline:

  1. Click the Sort icon
  2. Select either Start Date or Due Date or Assignee
 
layout

To save your view, click on the drop-down arrow next to the project name and click Save layout as default.

Once you sort your tasks on your timeline by start date, due date, or assignee, the project sections will disappear. To navigate back to your sections, sort by None.

Subtasks on timeline

Viewing subtasks on your timeline will help you manage complex projects with many dependent workstreams.

subtask

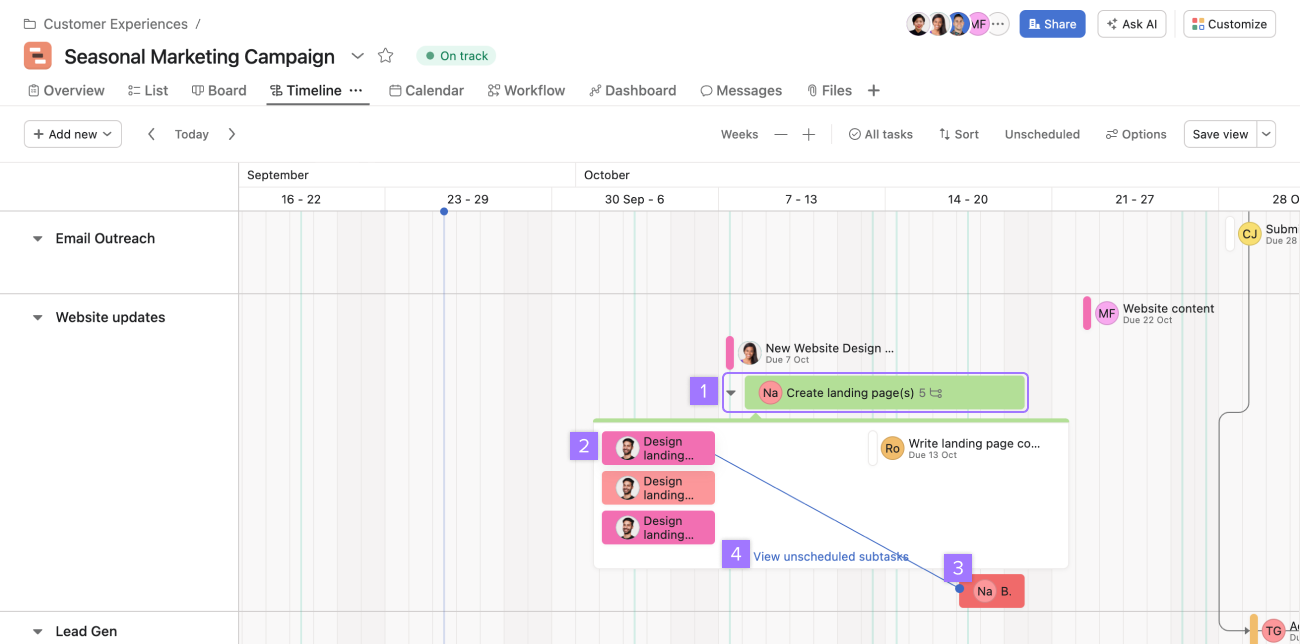
From your timeline, you can:

  1. Click the arrow to the left of the task box to view its subtasks. The subtask count appears next to the task name.
  2. Click on the subtask to view its task details pane
  3. Set up dependencies for subtasks with the connector icon by dragging it to another task
  4. Change the subtask’s due date
  5. View unscheduled subtasks. Click this link to schedule these subtasks from the task details pane.

Unlike parent tasks, subtasks can’t be created from the timeline view. To create a new subtask, navigate to the parent’s task details pane and add the new subtask. You can also add new subtasks from the project’s list view.

Only the first level of subtasks will be displayed.

When you expand a task to see its subtasks, it will remain expanded when others visit the timeline. If you close the subtasks container, it will remain closed when others visit the timeline. Any of these actions taken on the timeline will become the timeline’s default layout.

The zoom button should be on Days or larger to view subtasks on the timeline.

Filtering on timeline

Using your project toolbar, you can filter your timeline according to your desired preferences.

You can filter your timeline to show IncompleteComplete or All tasks.

Portfolio timeline

Available on Asana AdvancedEnterprise, and Enterprise+ tiers, as well as legacy tiers Business and Legacy Enterprise. Visit our pricing page for more information.

Portfolio timeline allows you to visualize, share, and adjust how initiatives are sequenced so you can best utilize your resources and hit your deadlines.

Find out more about portfolio timeline in our portfolios Help Center article.