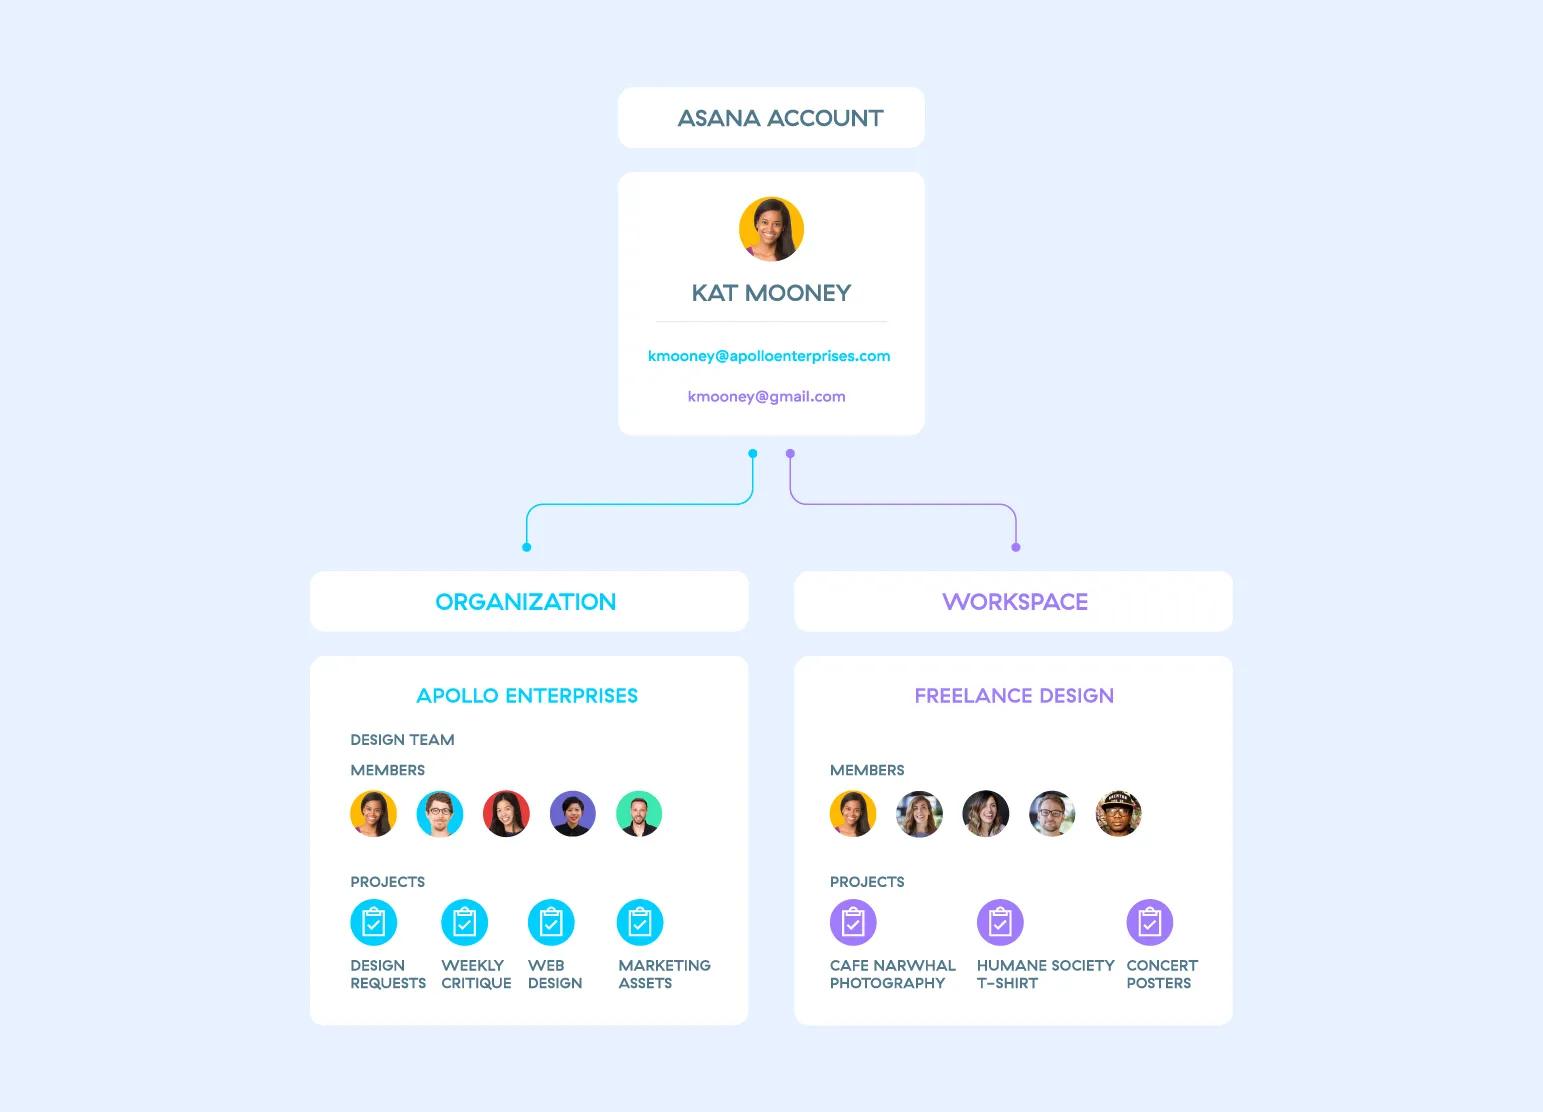
Asana accounts are free and are tied to individual users. Asana accounts grant access to shared workspaces and organizations to collaborate with other Asana users.
With a single Asana account, you can create or join multiple workspaces and organizations to collaborate with various groups of Asana users. These workspaces and organizations you belong to are their own separate entities, each with their own unique set of people, projects, and tasks.
Since each workspace and organization are their own separate entities, your colleagues cannot see the other workspaces or organizations you belong to, nor can you see the other workspaces or organizations your colleagues may belong to. Learn more about privacy between these spaces here.
Like what you see? Get started with a free 30 day Asana trial today. Try for free
What is a workspace?
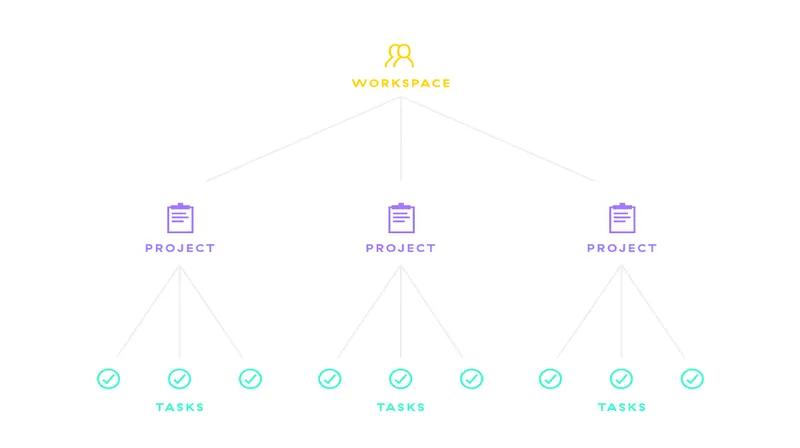
A workspace is a collection of people that collaborate on projects and tasks. Workspaces can be used by any group of people and do not require a common company email domain, like organizations do.
People who create an Asana account with a personal email address (i.e. @gmail.com
or @yahoo.com
) will start off with a workspace.
If you have a company email domain, consider using an organization instead.
People in your workspace
There are two types of people in a workspace: workspace members and limited access members. Workspace members have full access to your workspace, while limited access members are limited to the projects, tasks, and messages explicitly shared with them.
Workspace members
Workspace members have full access to all public projects, tasks, and conversations in your workspace.
All workspace members can:
- Rename the workspace
- Upgrade the workspace to a paid plan
- Become billing owner of any paid workspace
- Invite or remove people from the workspace
- Convert people to members or limited access members
Limited access members
Limited access members are people with restricted access to your workspace. Limited access members will only see projects you share with them. You might invite contractors, clients, or other third parties as limited access members, giving them access to relevant projects and tasks without giving them access to everything in your workspace.
Limited access members cannot:
- Rename the workspace
- Upgrade the workspace to a paid plan
- Become billing owner of the paid workspace
- Invite people as full workspace members
- Remove people
- Convert people to members or limited access members
Limited access members can:
- Create new projects and tasks
- Edit the projects and tasks that have been shared with them
- Invite other limited access members
- Compose messages
The role of guest is not available in workspaces. Every member of a workspace counts towards the subscription's seat limit.
Identifying members and limited access members

From the Members tab on your left sidebar you can:
- See an overview of membership status
- Select Limited access members
- Select Remove to remove members
- Invite members to join
Workspace members can also convert any member into a limited access member, or vice versa, from this window.
Create a workspace
Create a workspace to collaborate with other people in Asana.

To create a new workspace:
- Click on your profile photo and select My Settings... from the drop-down menu
- Click on the Account tab
- Select Create new workspace
A single Asana account can join or create multiple workspaces. Create workspaces for different groups of people you want to collaborate with.
Convert your existing workspace into an organization
If you need to create multiple teams or work across different departments, you can convert one of your existing workspaces into an organization. Learn about the differences between workspaces and organizations here.
You must first add your company email address to your Asana account before you can convert a workspace into an organization.
To access your workspace admin console:
- Click on your profile icon
- Click on Admin console

From the admin console:
- Head to the Settings tab
- Click on Convert to organization

From the Convert to organization tab:
- Select your work email address
- Verify Terms of Use
If this email domain is not already in use with another organization, you will be prompted to click the Convert button.
If you're in a paid workspace, only the billing owner will be able to convert it to an organization.
Learn more
Issues converting your workspace?
If you have difficulty converting one of your existing workspaces into an organization and you're not seeing the message that your email domain is already in use, please contact the Asana Support team and include the following information:
- The name of your organization or your largest/most active company workspace
- Your email domain
We will then help you to convert your largest workspace into a new organization.
Copy this text to speed up the process:
Primary organization/workspace:
Email domain:
If you have a shared university email domain (i.e.,
college.edu
), a separate subdomain (i.e.,staff.college.edu
) will be required to create an organization.
Workspace admin console
Access the admin console menu to:
- Edit the workspace name
- Manage people and invitations
- Manage billing applicable for those who've upgraded to a paid workspace
Only workspace members can access the admin console. Limited access members cannot.

From the admin console, you can access the following tabs; Members, Billing, Settings, Apps, and Resources:
Members

From the Members tab, you can:
- View a list of members and limited access members in your workspace
- Convert any member into a limited access member, or vice versa
- Remove any member or limited access member from your workspace
- Invite new people into your workspace
Settings

From the Settings tab, you can:
- Change your workspace name
- Convert your workspace into an organization
Deactivate a workspace
Since workspaces are shared spaces, leaving a workspace does not delete the projects and tasks in it.
If your workspace is no longer needed, you can deactivate it by:
- Removing all tasks
- Removing all projects
- Removing all other members
Once everything has been deleted, and you're the only remaining member, you can leave the workspace.
A workspace can only be accessed by those invited. If all members have been removed, the workspace will no longer be accessible.
It is not possible to archive workspaces.
Join an existing workspace
In order to join an existing workspace, a current member must invite you.
Leave a workspace
You can leave a workspace if you are no longer actively collaborating with the workspace members.
Once you leave, you will not have any access to projects or tasks in the workspace and the workspace will no longer appear when you click your profile picture, but the workspace will continue to exist.
To leave a workspace:
- Click your profile photo in the top-right of your screen
- Click My Settings...
- Navigate to the Account tab
- Select Remove me from this workspace at the bottom of the page
Once you leave a workspace, you will no longer have access to its projects and tasks.
Manage workspace members and limited access members
As a workspace member, you can use the admin console to:
- Invite other members and limited access members
- Cancel invitations
- Convert members to limited access members, or vice versa
- Remove members and limited access members

Access the Members tab through the admin console
- Click your profile photo and select Admin console from the dropdown menu
- Navigate to the Members tab
Here you will also see the number of workspace members and limited access members at the top of the menu. Upgrade your workspace to add more people once you reach your limit.
Convert members and limited access members
You can convert any member into a limited access members to limit their access, or convert any limited access member into a member to give them access to all public projects in your Workspace.

To convert a member into a limited access member, or vice versa:
- Navigate to the Members tab in the workspace admin console
- Click on the three dot icon to the right of the person's name and click Member (or Limited access member) to toggle between the two.
Invite people
Invite people from the Members tab of your admin console
You can invite people to your workspace from the Members tab of your admin console

To invite from the admin console:
- Navigate to the Members tab
- Click on the Invite members button
- Enter the person's email address
- You can choose a project from the drop-down menu
- Click the Send button
You can make a workspace user a limited access member by clicking the three dot icon beside their name within the Members tab of the admin console.
Invite people from within a project
You can also invite people from within a project as follows:
- Select the project you'd like to invite someone to from the sidebar or search bar
- Click into the Members icon at the top of the project to open a Share project window
- Invite users by adding project members by email or name
You will be alerted when inviting someone to the project who is not yet part of your workspace.
Cancel invitations

To cancel an invitation from the admin console:
- Navigate to the Members tab in the admin console
- From here find the user whose invitation you wish to cancel
- Click on the three dot icon
- You will see an option to Cancel invitation - click on this to cancel the invitation
The person whose invitation you cancel will still have received their invitation email, but following the link will no longer lead them to your workspace or project. Instead, they'll see a "Sorry, you don't have access" error message.
Remove members and limited access members
Remove members or limited access members from your workspace if you no longer want them to have access to the workspace's projects and tasks.

To remove people from your workspace:
- From the Members tab click on the three dot icon beside the member's name
- Click Remove
When someone is removed from your workspace, the tasks, projects, messages, attachments and comments the person created will remain intact, but their previously assigned tasks will now be left unassigned.
To ensure no tasks go unaccounted for, it is a good idea to go into the person's My tasks and reassign their tasks before removing them.