Products
AI Platform
Asana Foundations
Company Type
Visit our pricing page for more information.
Available on Asana Starter, Advanced, Enterprise, and Enterprise+ tiers, as well as legacy tiers Premium, Business, and Legacy Enterprise.
Portfolio rules are available on Asana Advanced, Enterprise, and Enterprise+ tiers.
Visit our pricing page for more information.
Rules allow you to streamline routine tasks and establish workflows with ease. For a rule to work, you need a trigger that activates the rule and an action that is performed automatically. For example, a rule can be created to automatically assign a task (action) when a due date is set (trigger).
Explore rules for free. Start a free Asana trial today.
Power up your processes with Asana Rules. Join our Automating workflows in Asana virtual training to learn how.
Rules are available in both projects and portfolios. You can set up rules within projects and portfolios, allowing you to automate key actions and ensure the smooth management of multiple projects.
When creating a rule, you can choose from pre-built rules in the rules gallery, or create a custom rule. Pre-built rules in the gallery have been designed to address common workflow scenarios. Custom rules allow you to create rules tailored to your unique processes.
Note
Each rule in Asana has its own unique URL that can be accessed directly through the browser. These URLs are automatically generated when rules are created and remain consistent throughout the rule's lifetime.
The custom rule builder is available on Asana Starter, Advanced, Enterprise, and Enterprise+ tiers, as well as legacy tiers Business, and Legacy Enterprise.
Rules will only run on the first level of subtasks (i.e. rules will not run on sub-sub-tasks, sub-sub-sub tasks, etc.)
Edit your rules any time by navigating back to the project and selecting the rule you want to update.
Any edits you make to your rules will only apply on a go-forward basis. Edits will not apply retroactively.
Rules that involve external triggers or external actions such as sending emails or direct messages (e.g., via Outlook, Salesforce, or Slack) can only be edited by the rule's creator because the external triggers/actions are authenticated using the rule creator's account credentials.
You can pause a rule at any time by clicking into the rule on your sidebar and click Active. If you would like to make the rule active again, follow the same steps, but click Paused.
You can delete a rule at any time by clicking into the rule from your sidebar, and then clicking the Delete rule button.
To access rule settings, click the gear icon in the top-right of the rule builder.
Rule settings contain 2 tabs: General settings and Permissions settings.
Under General settings, you can manage the name of the rule. You can also choose whether the rule can be triggered by other rules, and whether the rule should run on subtasks.
Under Permissions settings, you can view the rule owner and select the rule editor permissions.
If a rule's original owner loses access to the project or leaves the organization, team members with edit permissions can claim ownership of the rule. Asana will notify project editors when rules become orphaned, making it easy to identify which rules need attention.
To claim ownership of an orphaned rule, navigate to the rule in your project's rules list and within the Permissions menu click Become owner. Once you claim ownership, you'll be able to edit the rule and receive notifications about any issues.
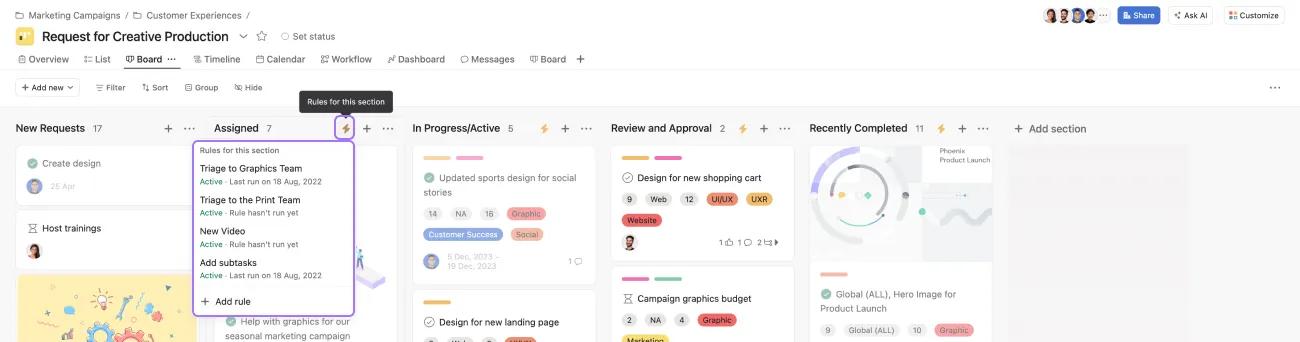
On paid plans, the lightning bolt icon in sections indicates that a rule is applied to that specific section. These are visible in list and board views.
Once the rule triggers, the icon will become animated. Clicking the lightning bolt will open a rules menu for that section, allowing you to add new rules or edit existing ones.
You can edit a rule by clicking the pencil icon that appears when you hover over it.
You can also use trigger combinations and/or conditional logic and multiple actions to automate routine tasks.
You can use the act performed by one rule to trigger another.
The maximum number of rules per project is set at 50, regardless of plan size or tier.
Column or section based triggers are for board view projects or projects with collapsible sections.
Custom field rules are available on all projects with custom fields. People custom fields are also supported.
To unlock these rules, you must first add a custom field to your project.
With bundles, you can apply multiple rules at once. This allows you to standardize processes at scale and make retroactive updates to projects that are already in flight.
If a rule becomes mis-configured (example: “Marked complete > Move to column “Done” and someone deletes your “Done” column), we will email the owner of the rule to let them know to fix it.
We will email you the first time a rule is triggered but cannot fire due to being misconfigured. We will not email you again until it has been corrected and successfully run at least once before misconfiguring again.
All users with read access to the rule in question can see the correct status of the rule.
Once you update the rule to a correct configuration and save the updates, those warnings will go away.
Rules are available across every paid tier in Asana. The custom rule builder is available on Asana Starter, Advanced, Enterprise, and Enterprise+ tiers, as well as legacy tiers Business, and Legacy Enterprise.
A subset of rules are available to customers on the legacy tier Premium:
Rules automate routine tasks by combining a trigger (like setting a due date) with an action (like automatically assigning the task to someone), allowing you to streamline workflows without manual intervention.
Yes, you can edit any rule by clicking the customize menu, selecting the rule under the Edit section, and clicking Edit, though changes only apply to future tasks and not retroactively.
Asana emails the rule owner the first time a misconfigured rule fails to fire (such as when a referenced column is deleted), and all users with read access can see the rule's status until it's corrected.
You can add up to 50 rules per project regardless of your plan size or tier, and you can add up to 20 triggers and 20 actions per custom rule.
Discover time-saving automation tips in the forum.