Products
AI Platform
Asana Foundations
Company Type
Capacity plans give leaders the ability to optimize resourcing decisions by visualizing project staffing over long periods of time. Unlike workload, which manages task assignments, capacity plans allow you to allocate individuals to entire projects and get a high-level view of how people are staffed across workstreams.
Note that capacity plans and workload are not connected at the moment. A colleague may be allocated to a project in a capacity plan, yet have no tasks assigned to them yet, or vice versa.
The capacity planning feature is available on Asana Enterprise and Enterprise+ tiers, as well as legacy tier Legacy Enterprise.
To set up a capacity plan, navigate to Resourcing, under the Insights section of the sidebar. Navigate to the Capacity plan tab and click + Create.
When you create a capacity plan, you’ll see two tabs; Projects and People.
You can add projects or entire portfolios from the projects tab. If you add a portfolio, it will add all the projects from that portfolio to the capacity plan, and stay updated if projects are added or removed from the portfolio.
Click the +Add project button to start adding projects or portfolios. To staff your team across the projects, add the name or email of the people you want to staff for each project.
You can add your team from the people tab by clicking the + Add people button in the top-left corner and selecting the teammates you would like to staff on projects.
Next, add your team by clicking the + Add people button in the top-left corner and selecting the teammates who you would like to staff on projects.
Once you’ve added your team, it’s time to allocate resources. Staff your team across various projects by clicking their profile picture in the capacity plan and selecting + Add project to allocate. Add projects that people are currently working on and will work on in the future to get a long-term overview of your team’s capacity.
If a colleague already has projects allocated to them in other capacity plans (or on the other tab), even by other people, you will still see those allocations. This assumes you have permission to see the projects involved, based on project privacy settings.

Portfolio level capacity planning provides a comprehensive view of total effort across all projects within your portfolios by showing summary statistics at the top of capacity plan project tabs. This allows you to see total effort (measured in hours, people months, or other units) across all projects in your portfolio.
Portfolio level capacity aggregation appears as a summary row at the top of capacity plan project tabs.
This summary row allows portfolio managers and team leads to:
To create an allocation, simply click where you want to add it. It will automatically create an allocation that matches the time zoom level (day, week, month).
You can extend or shrink these allocations by dragging on either end to the dates that you want. You can drag the entire allocation when plans change.
You can bulk move and bulk delete allocations by holding the Ctrl or Command key, selecting the allocations, and either dragging them all together or pressing the delete key.
The example below shows how to bulk move, bulk reallocate, and bulk delete allocations.
Multiple people can be allocated to a single project at once from the Projects tab. You can view everyone who is staffed on a project by clicking the three dot icon next to the project name and clicking View project details.
View the gif below to see how to quickly open up project details without leaving the capacity plan.
You can bulk-move all allocations in a project from one user to another by using Transfer allocations. Click the 3-dot icon beside the project name, select Transfer allocations, and type in the name of the user who should be allocated the work. See the below image for more detail.
From the people tab, you can quickly filter down to specific teammates by name or job title. If you’d like to see the workload of just the IT team members, type IT and click Select all.
You can filter the people list in your capacity plan using custom fields on users. This helps you focus on specific groups of people based on attributes like role, skills, team, or location when allocating work.
Note that job titles are managed through the admin console. Depending on your organization's settings, they can also be managed by each individual.
Admins can edit job titles directly from the People tab. Click the three dot icon next to the person's name and click Edit profile. From there, admins can change the job title.
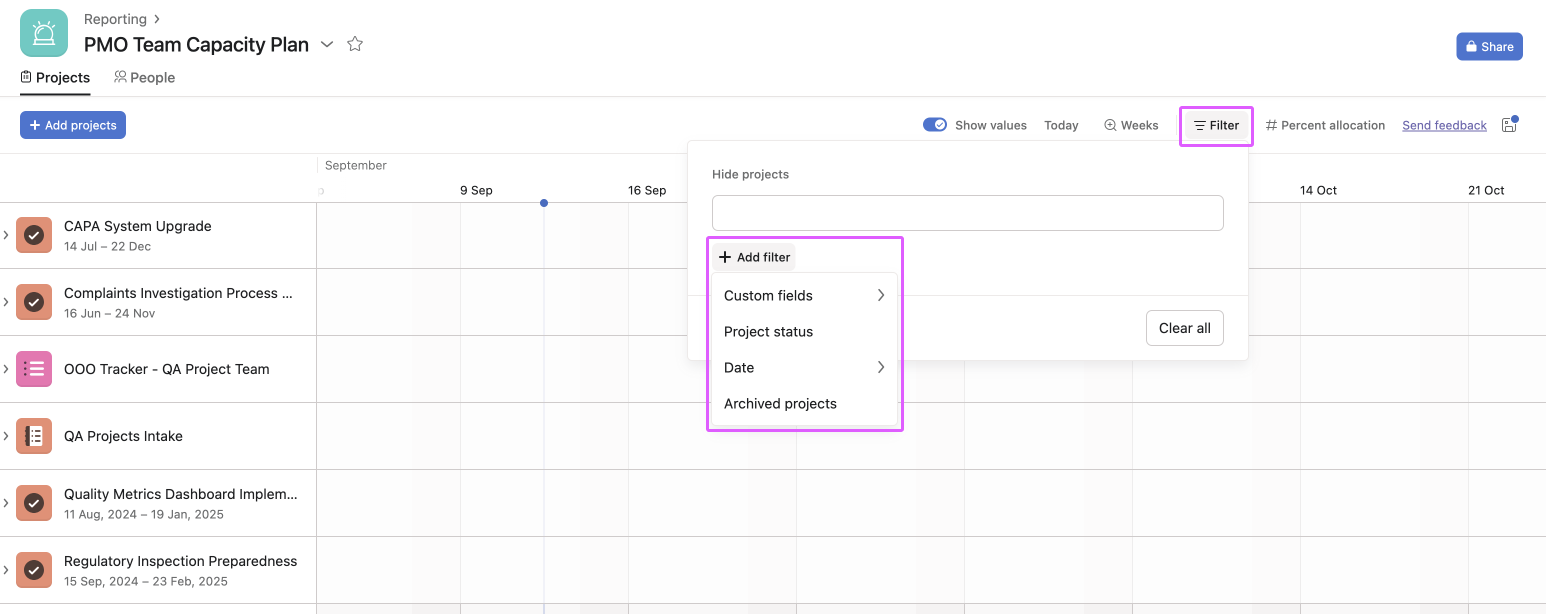
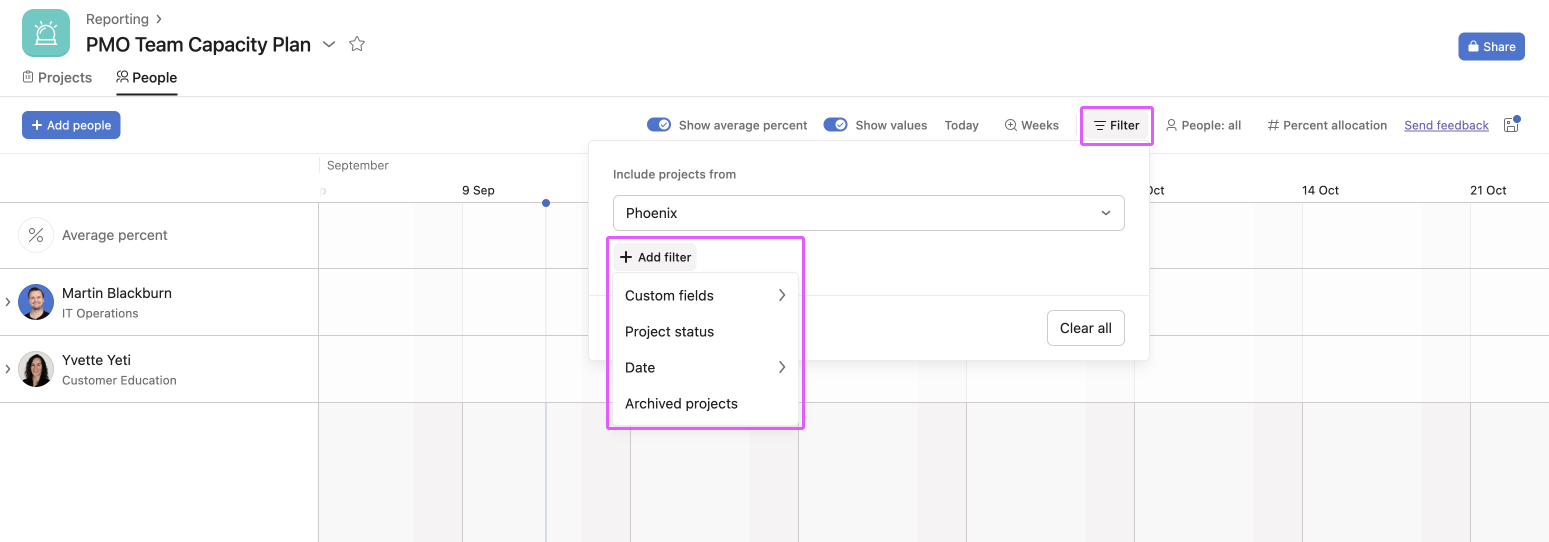
You can use filters to hide specific projects, from both the Projects and People tabs within a capacity plan.
From the Projects tab, select Filter. Next, choose to hide specific projects or click Add filter and choose specific criteria such as custom fields, project status, or project due date. You may use the filter to see only projects whose status is At risk, which are due in the next 3 months, for example.
In the same way, you can choose to filter only specific projects or those matching certain criteria from within the People tab. From the People tab, click Filter and choose your filter criteria.
Capacity plans support the creation of saved views as new tabs. See this article on project customization and views for more on saved views.
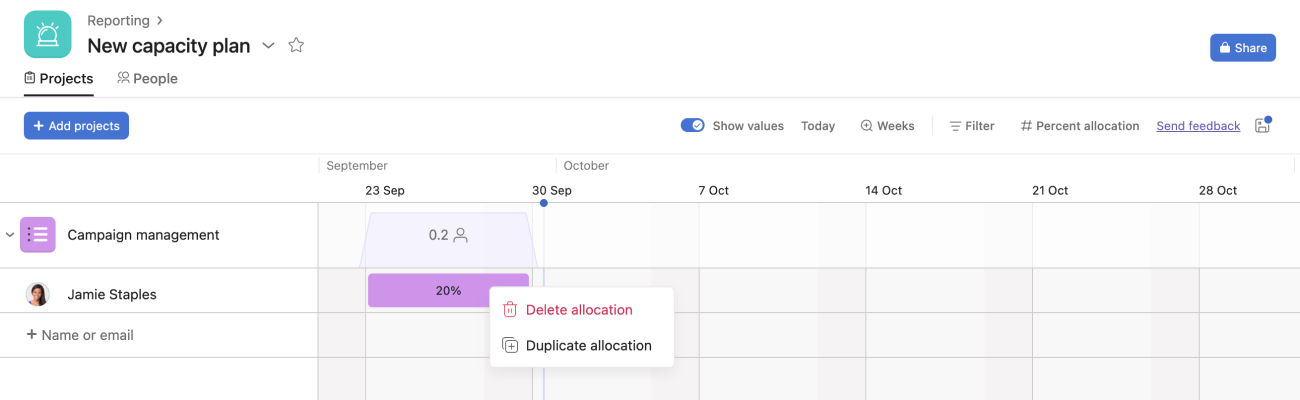
You can delete any allocations by selecting the allocation and pressing the delete key or right-clicking on them.
You can duplicate allocations by right-clicking on them and selecting Duplicate allocation.
You can group capacity views by custom fields to understand how work is distributed. Grouping helps you spot imbalances quickly and compare capacity across teams, roles, or project categories without changing any underlying allocations.
In the people view of capacity plans and in Universal Workload, you can group by custom fields on users. Open Resourcing, select your capacity plan, and click People. Click Group and choose a user custom field to create groups that reflect values like role, location, or team.
In the projects view of capacity plans, you can group by project custom fields. Open Resourcing, select your capacity plan, and click Projects. Click Group and select a project custom field to organize work by attributes such as priority, business unit, or program.
Note
To learn more about adding custom fields on users, see our Custom fields on users article.
Available on Asana Enterprise and Enterprise+ tiers.
Placeholders enable you to reserve capacity for upcoming work without immediately assigning specific individuals. Incorporating placeholders allows teams to more accurately forecast workloads, avoid overbooking, and ensure equitable task distribution among team members.
To create a placeholder:
To avoid confusion when a placeholder name is used in multiple teams (e.g., "Project Manager"), each placeholder must be assigned to a specific team.
You can also create placeholders from the People tab of your capacity plan.
Once you know who will be working on the placeholder resources, click the three dot icon next to the placeholder, select Transfer allocations, and type the name of the person you want to transfer the allocations to.
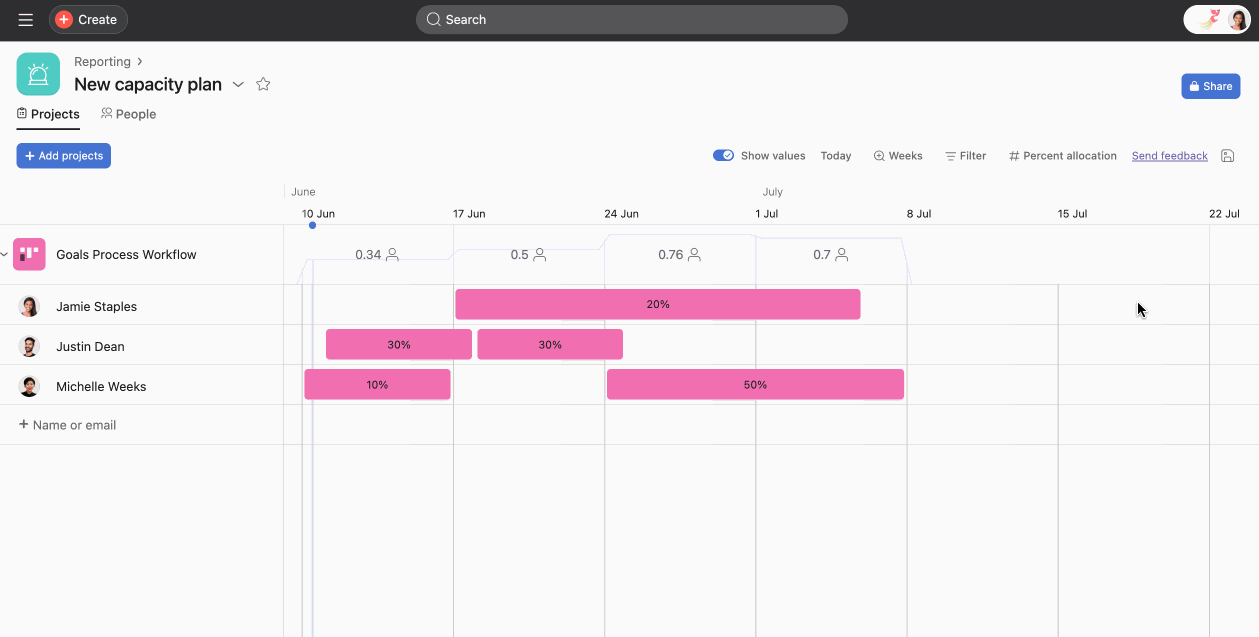
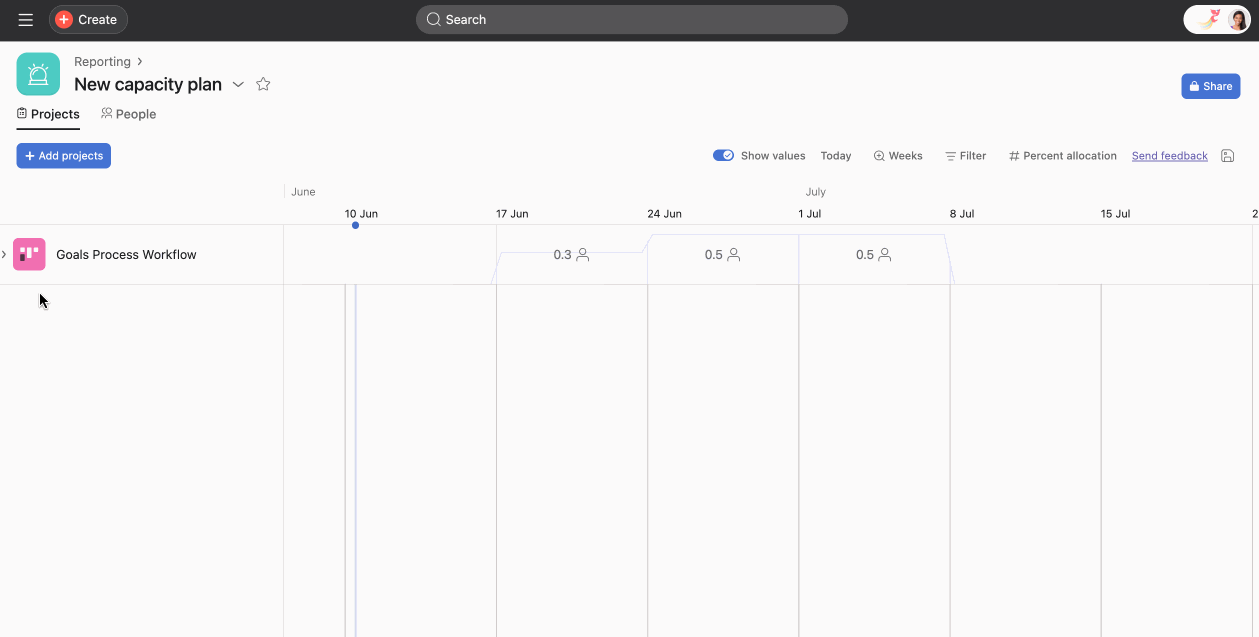
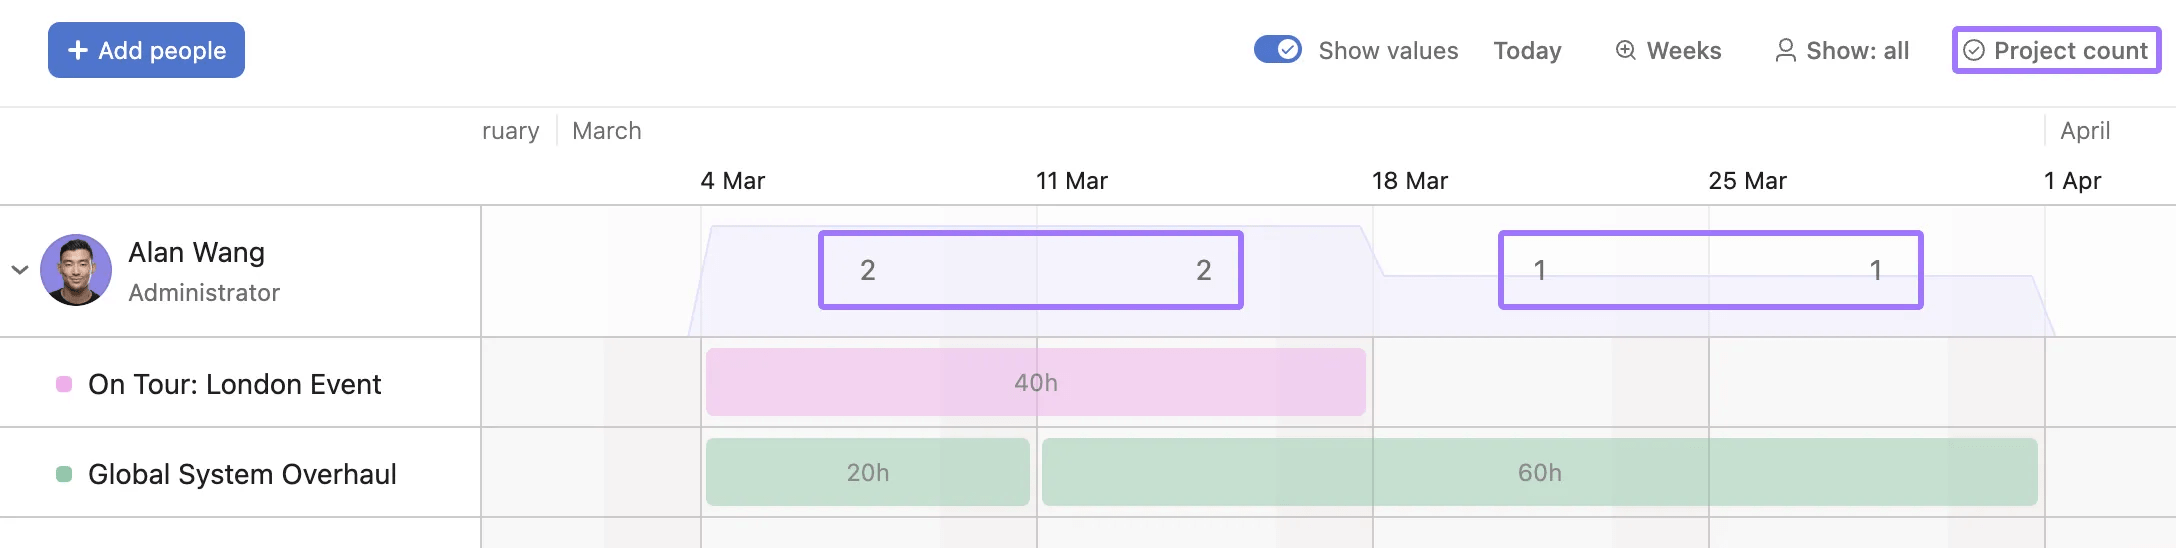
When planning a project, decide how you want to measure capacity. You can choose between Percent allocation, Estimated hours, or a simple Project or People count. It's best to be consistent with whatever option works best for your team.
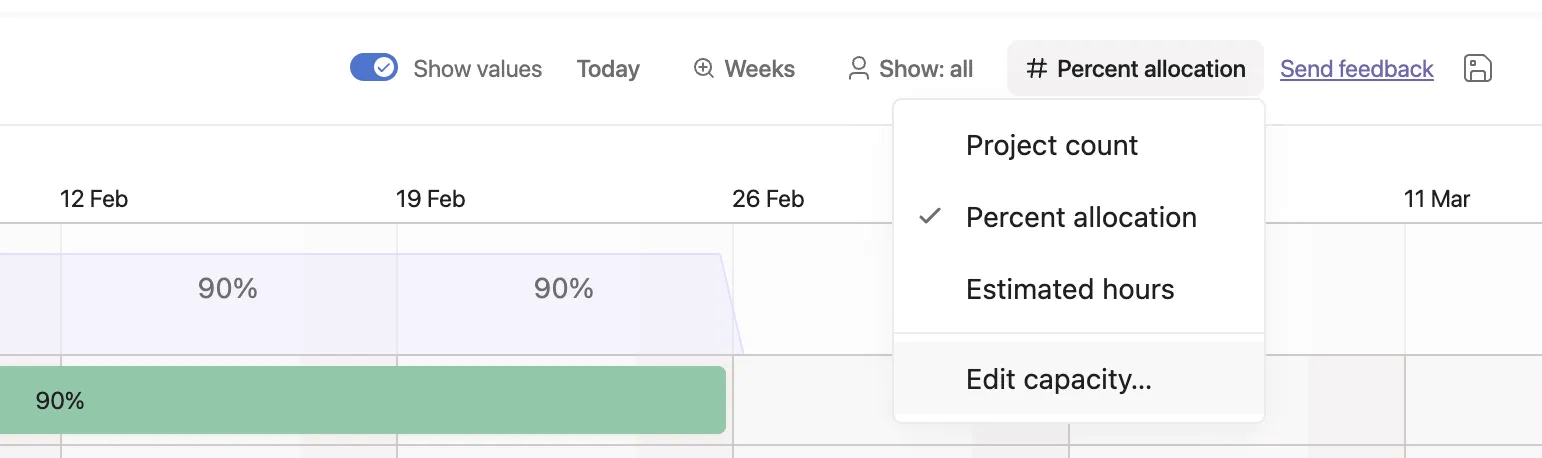
Percent allocation is the most common and straightforward way to measure where people are spending their time without having to worry about calculating hours.
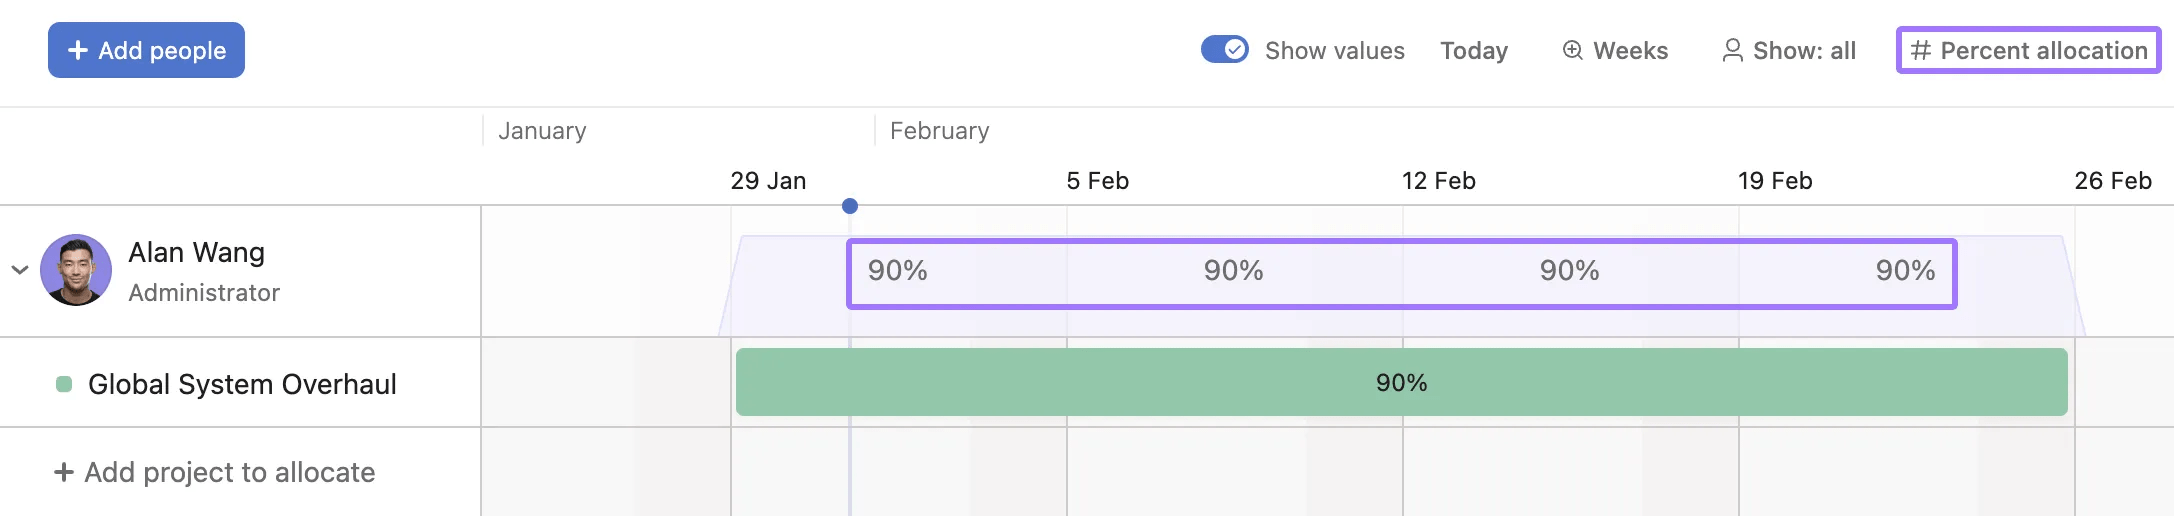
In the example below, Alan is due to dedicate 90% of his time to the Global System Overhaul project. Beverly is working on two projects whose dates overlap, and is due to spend 80% of her time on each. Since she’s going to be over capacity one week, the capacity is displayed in red, giving her, her team, or her manager some notice in order to shift things around or bring in some extra help for this time.
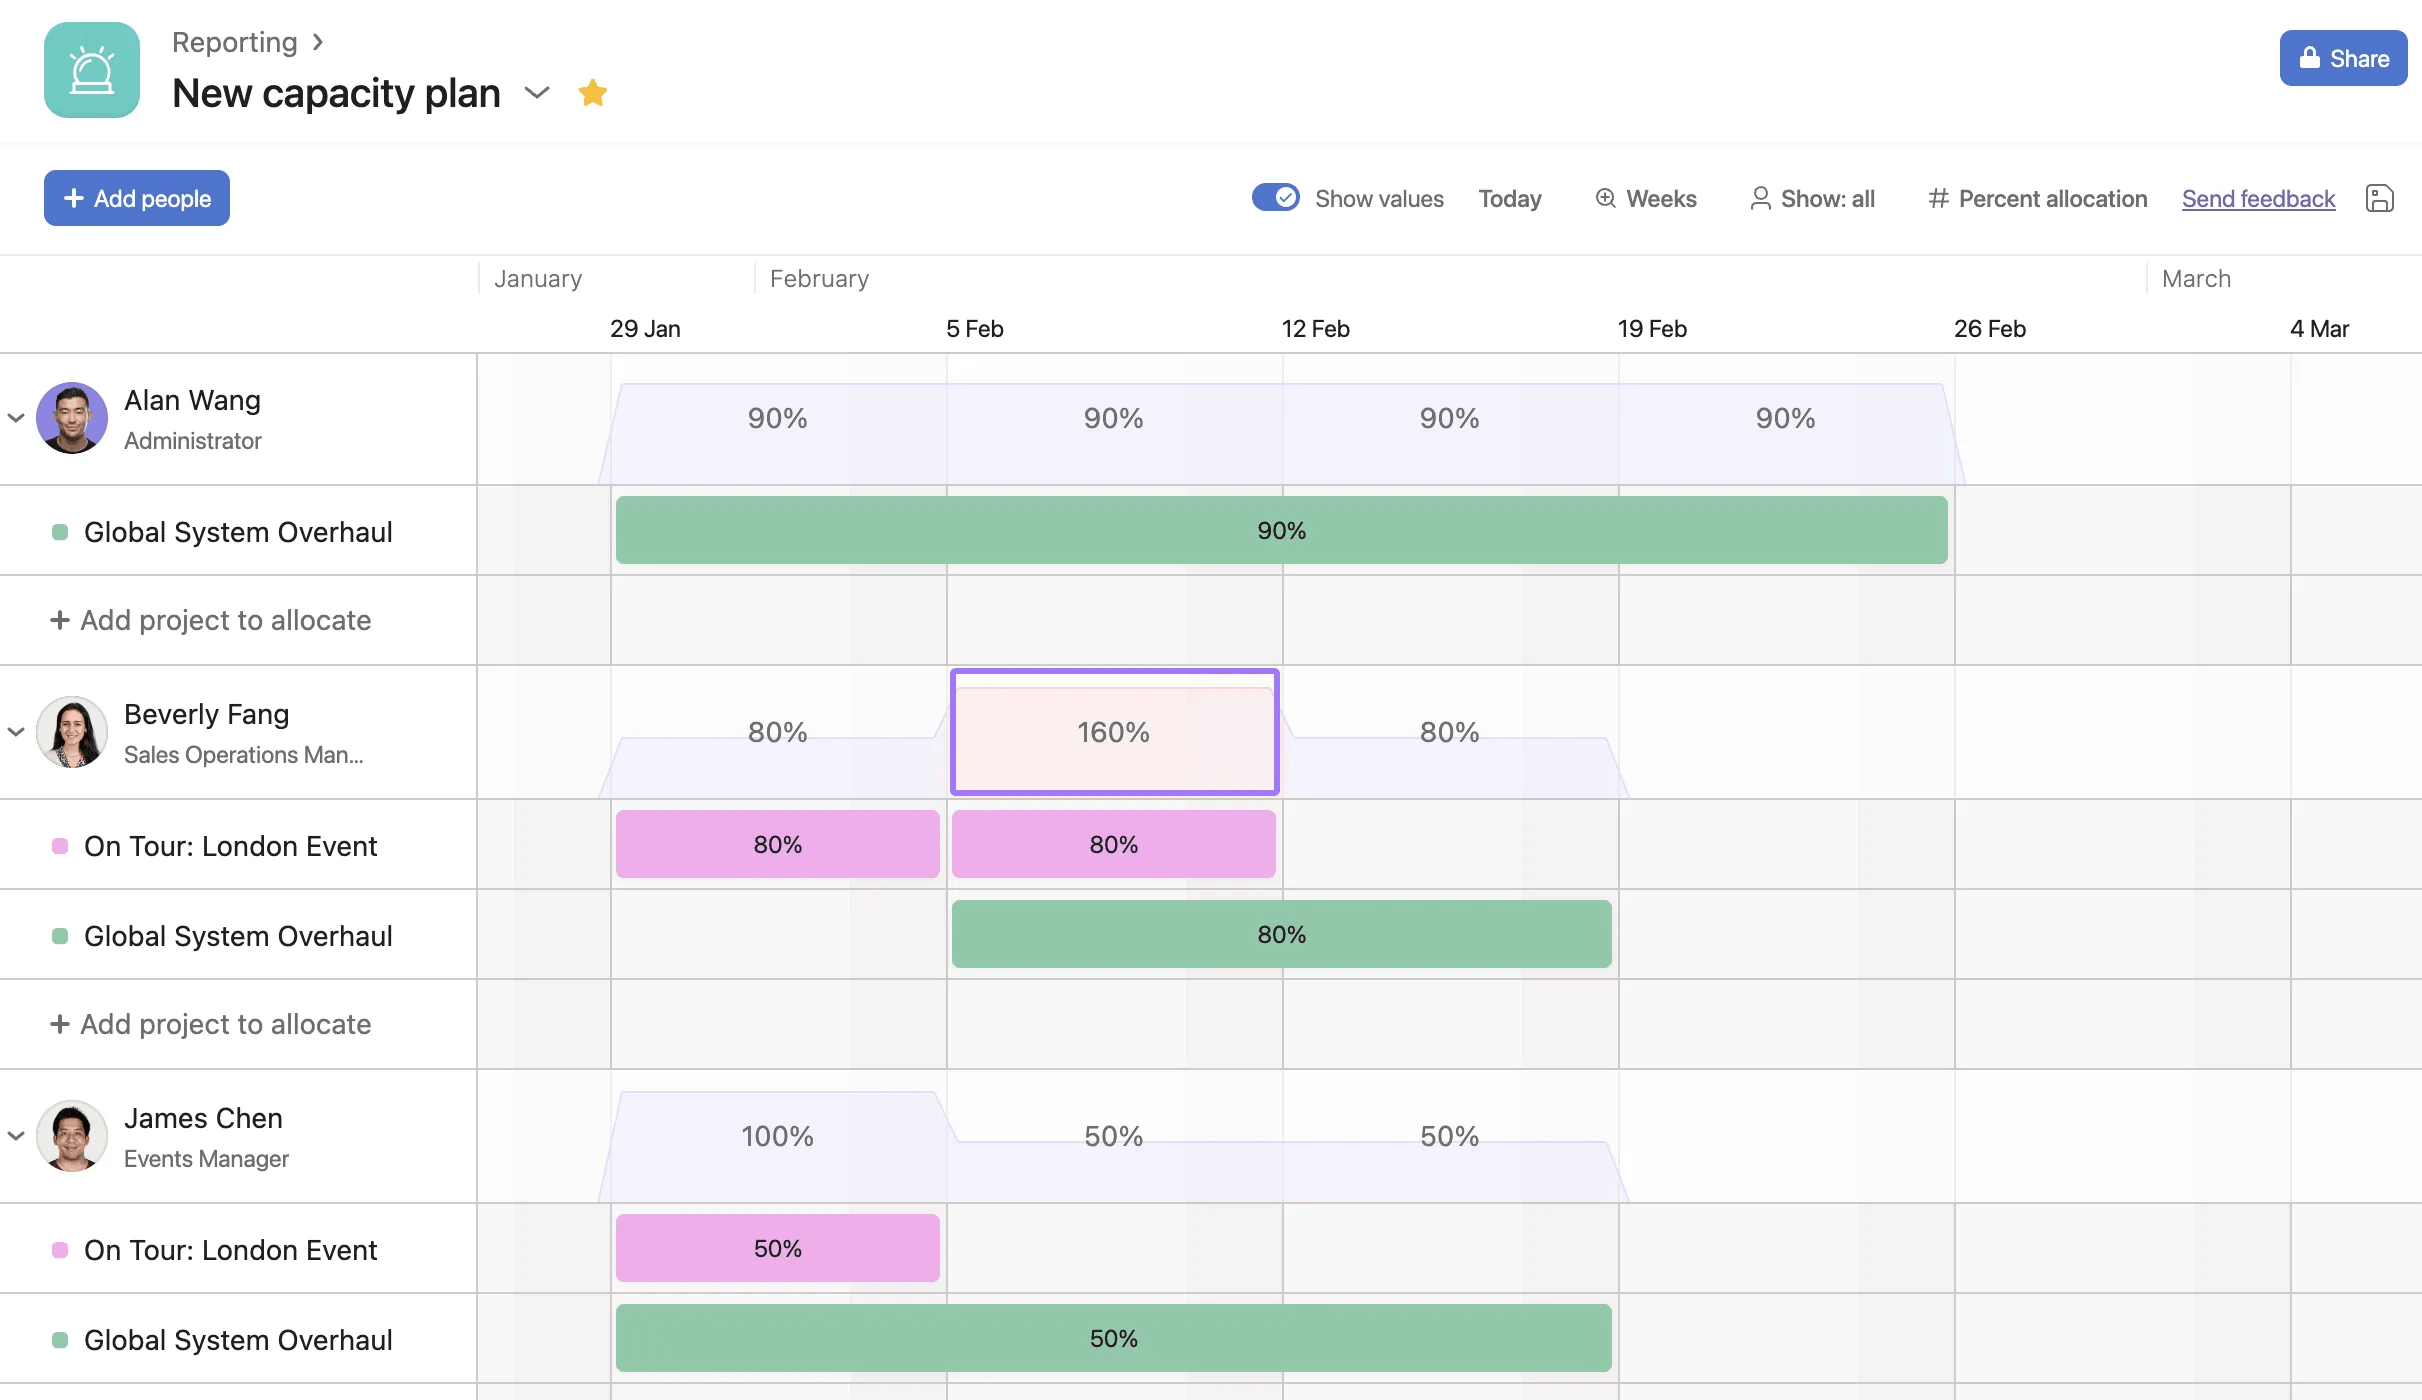
People or project count simply shows the total number of projects a person is working on during the chosen time or the number of people working on a specific project. In the example, we can see that Alan is working on one project some weeks, and two at a time on other weeks.
Estimated hours is best if you precisely plan projects down to the hour and want to create allocations against these estimates. Estimated hours tends to be easiest when you're planning week by week because months have a varied number of working days.
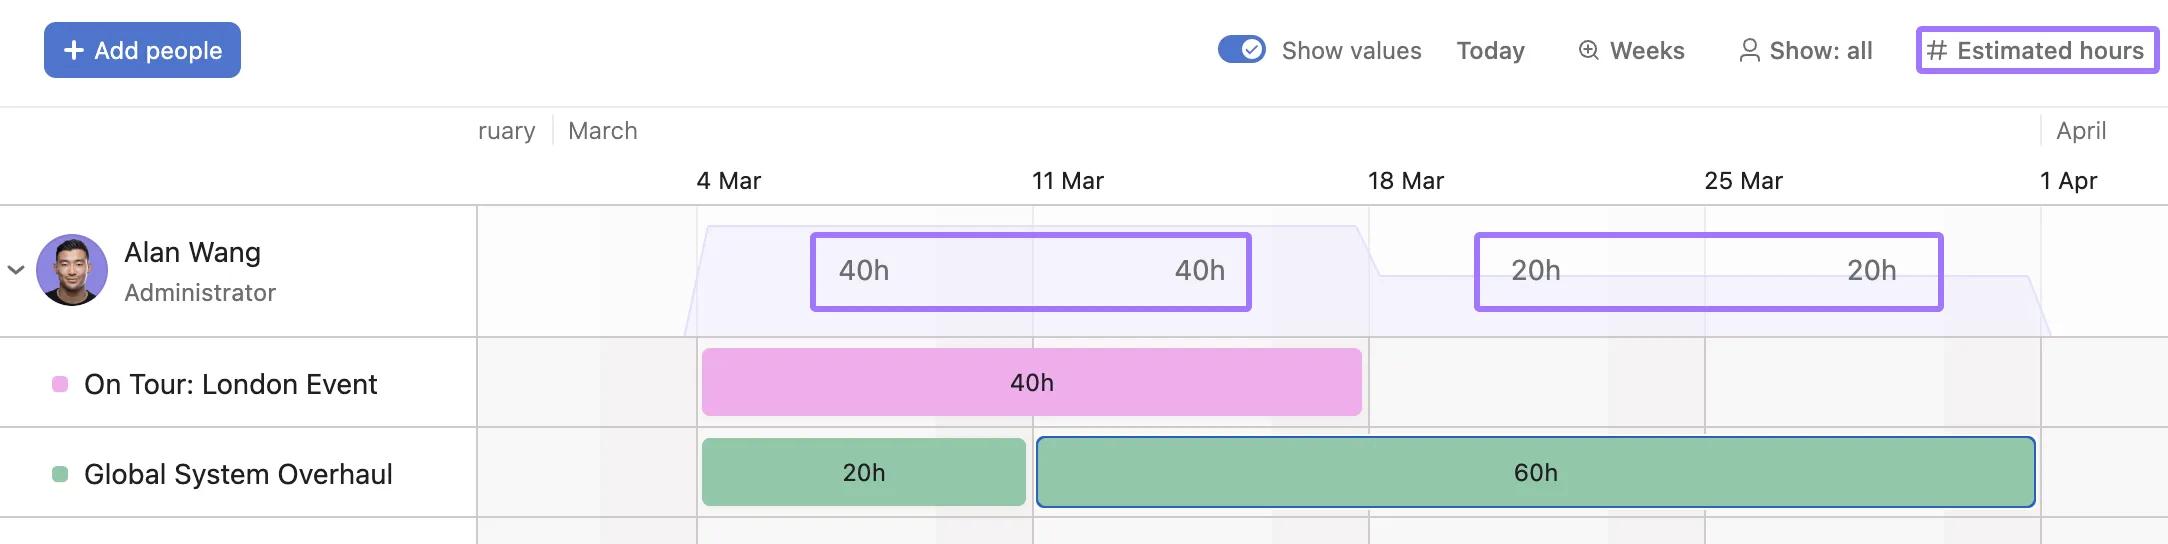
If you're working with Percent allocations or Estimated hours, you can adjust the capacity for each individual in the menu. You can make everyone's capacity the same or manually adjust each individual. For estimated hours, this applies to weekly capacity.
Allocating people to a project using capacity planning does not notify them - users don’t get an inbox notification or email if they’ve been allocated to a project. This is ideal for planning in advance, since you can make changes, try things out, and even start over - all without confusing your team with notifications or tasks until you’re ready to share.
When someone is allocated to a project, that allocation lives on the project and is not specific to any single capacity plan.
This means, for example, that if a capacity plan exists where Alan is allocated to the Global Systems Overhaul project, and a colleague creates another capacity plan where they add Alan, they will see that he is allocated to the Global Systems Overhaul project for certain dates. This assumes the colleague has permissions to see such a project.
You can update capacity plan data or export the data out of Asana with our API. To understand how the API works, it's important to understand how capacity plans and allocations work. Allocations allow Asana to track and present how much time each user is staffed to different projects. For example, if Sam is staffed on Project A for 50 hours in September and 40 hours in October, that would be two allocations. These are displayed in the capacity plan as two colored bars.
Whenever a capacity plan is loaded, Asana queries the Allocations API to pull in all the relevant allocations for that user or project, and you can do the same with our API. Allocations exist at the domain level, and capacity plans act as a filtered view to present this data. For example, if you add a team member to a capacity plan, all their existing allocations across various projects will be automatically fetched and displayed.
Any updates made to a user’s allocations—whether it’s adjusting time for a project or moving it to a different person—will be immediately reflected in all capacity plans they are on. This ensures that the capacity plan always displays the most up-to-date resource distribution.
You can use the Allocations API to export data and load it into any reporting tools you use (Tableau, Power BI, etc.) for more advanced reporting needs.
If you'd rather not use the API directly, you can export a capacity plan's allocation data as a CSV. On a portfolio capacity plan, open the tab's menu and click Export CSV. On a universal capacity plan, you can export from either the tab's menu or the plan's action menu (where you can pick which tab to export). The CSV includes one row per allocation, with the person, project, dates, and effort.